Friday, December 22, 2017
Tuesday, December 12, 2017
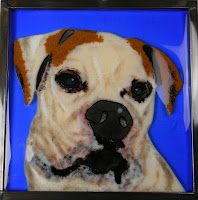
Painting with Frit Bulldog Panel
I love frit for its versatility
and ability to transform static designs into living, breathing pieces of art.
When I make detailed images like this Bulldog, frit is my go to material. It
affords me the flexibility I crave to maximize my creative flow.
This bulldog project is
perfect for the painting with frit technique. With frit, I can render the
subtle color shifts and shadows that make the dog’s expression so loveable. To
contrast the frit’s shading, I chose a solid, jewel tone color for the
background. The simple background frames the dog in and complements the soft colors
in his face. There are other advantages to using a plain background for this
type of construction. It outlines an intricately shaped subject beautifully, it
ensures the accuracy of the shape and it contains the frit. Plus, the smooth background
contrasts the visually textured subject matter.
For complex images like this,
I draw my pattern on the computer using Glass Eye 2000 from Dragonfly
Software. I bring in a photograph with the add background option and then
draw over the image. The nice thing about working from a photo on live subjects
is I can use more interesting poses and perspectives with confidence. When the
drawing is done, I know the shapes of the body parts and their proportions are
accurate. Once I’m satisfied with the line drawing, I test different color
combinations until I get a mix I like.
This project is intended to
hang in a window. Therefore, I built the dog on a clear glass base so when back lit, light would shine through the dog’s face. I used opal frit colors for
the first layer of the dog’s face. This way the face would appear solid and not
disappear when the finished piece was on display. Opal and transparent colors
were used to detail the dog’s markings and to create soft shadows in the dog’s
coat.
Most of my frit projects are
completed in one firing. But for this adorable pup, I wanted to bring out the
warm undertones around his eyes and mouth, so it was fired twice. I laid
medium, opal brown down with a heavy hand. After it was fired and permanent, I
added a thick layer of the Champagne opal on top to match the picture more
closely. The layering gives the art a more realistic quality. I then added tiny
details around the eyes and reshaped the mouth. The project was then fired a
second time.
The fused panel is framed in
brass U channel with hooks installed to hang it securely from heavy duty line.
Tips for working with frit.
Don’t be skimpy! If you must
ask is it enough, add more. The frit should be 1/8” thick for strong color
saturation.
Know your colors. Consult the
manufactures catalog or larger frit sizes to confirm the powder or fine colors
you’ve selected are indeed the colors you want to use.
Be meticulous about the
clean-up. Nothing ruins an image faster than sloppy fabrication. You can do
better!
Pour it on! Frit may be small,
but even small applications can have a huge, positive impact on your work.
My favorite thing about the
finished project, the detail that I feel really brought Cooper to life, was the
addition of the catch light on his eyes. They’re made with strategically placed
tiny specs of white frit. It’s this kind of attention to detail that makes
pieces special.
Approach even your simplest
projects with that level of commitment and passion and you’ll see exciting
results as your art rises to the next level.
Watch the Painting with Frit
Bulldog video here
Enjoy!
Happy
Holidays!
Lisa
Follow my
blog for more tips and tricks!
Artist
Website www.LisaVogt.net
YouTube http://www.youtube.com/watch?v=dhOifd7wukk
Facebook www.Facebook.com/LisaJVogt
YouTube http://www.youtube.com/watch?v=dhOifd7wukk
Facebook www.Facebook.com/LisaJVogt
Author
Website https://lisajvogtcom.wordpress.com/
Twitter
https://twitter.com/lisajvogt
Upcoming Events
Reshape the way you slump
and drape glass!
Creative Slumping Webinar,
January 18, 2018
Now registering!
Advanced Glass Fusing Workshop
February 6 – 9, 2018
Wesley Chapel, Florida
4-Day, Hands-on
Go bigger and explore more
in-depth kiln forming techniques! Join me in this comprehensive, 4-day workshop
and enjoy, one-on-one instruction, step-by-step guidance to develop your own
design style and an individualized project program - make what inspires YOU!
Check out the New
Advanced Fusing Workshop video here
Subscribe to:
Posts (Atom)


