Mystery and magic attract us to glass fusing. It’s the mystery
of making something new and the magic of melting materials that hook us. I’ve
asked numerous students, and most admit that opening the kiln after firing is
their favorite part of fusing glass. We look forward to it with the same childhood
glee we have when opening a crisply wrapped gift.
When the project comes out as expected, or sometimes even
better, angels sing, unicorns exist and a rainbow glows brightly over your
studio. On the rare occasion that the project doesn’t come out well, our disappointment
is heartbreaking. We ask why, what was different, where did I go wrong? We rack
our brains looking for answers.
All the while, the answer is right there in front of you.
You just have to recognize what your broken glass is
telling you.
Let’s take a simple project and break it. Our sample project
is made of two full layers of glass, plus an accent layer. The base layer is clear
and the second layer is a pretty purple and the third, partial or accent layer is
a pattern glass with hints of purple.

To better understand why glass breaks, let’s do a little
review.
There are two basic stages to the firing process: heating
and cooling. During heating we take the kiln from room temperature to 1200° -
1500°, depending on the type of fused effect we want. Glass is sensitive to
temperature change between room temperature and 1000°. To avoid thermal shock,
which is breakage due to rapid temperature change, we heat the glass slowly from
room temperature until we reach 1000°.
Over 1000° we can heat the glass quickly to the desired
temperature. At 1265°, the glass will slump and take on the shape of a mold. At
1365° glass sticks together, otherwise referred to as tack-fuse. At 1565°, the
glass will completely melt into one smooth piece. This is considered a full
fuse. (These are System 96® temperatures.)
Once we have the desired effect we cool the glass. The
process of heating the glass causes stress within the project. We relieve the
stress by holding the glass at an annealing temperature for a period of time.
This allows the glass in the project to equalize at that temperature. (The System
96® annealing temperature is 960°.)
After fusing, during the cooling phase, the glass is
sensitive to temperature change from 1000° down to room temperature. And the
project now has greater value because it’s almost done. To avoid breakage due
to thermal shock, after the annealing hold, we slowly cool the glass down to
room temperature.
Read
between the lines.
Heating
Breaks
This is an example of what a break would look like if the
glass is heated too quickly. The clear base layer and the purple layer broke in
two on the way up. They’re visibly separated on the kiln shelf. Yet the accent
layer bridges the crack and the project is indeed fused and held together by
the accent layer. Layers one and two break because they are larger and
therefore have more mass. The greater mass is more sensitive to rapid heat. The
accent layer is smaller, less mass and therefore remains intact. A break like
this happens inside the kiln. This is a prime example of breakage due to
heating the glass too quickly.

It’s possible to break the project apart and refuse it slower,
but the finished product will likely be different from the original
design.
The
fix:
slow down. Heat the glass at a slower rate. I heat projects from 4” coaster size
to 12” bowls at a rate of 300° per hour with dependable success.
Cooling
Breaks

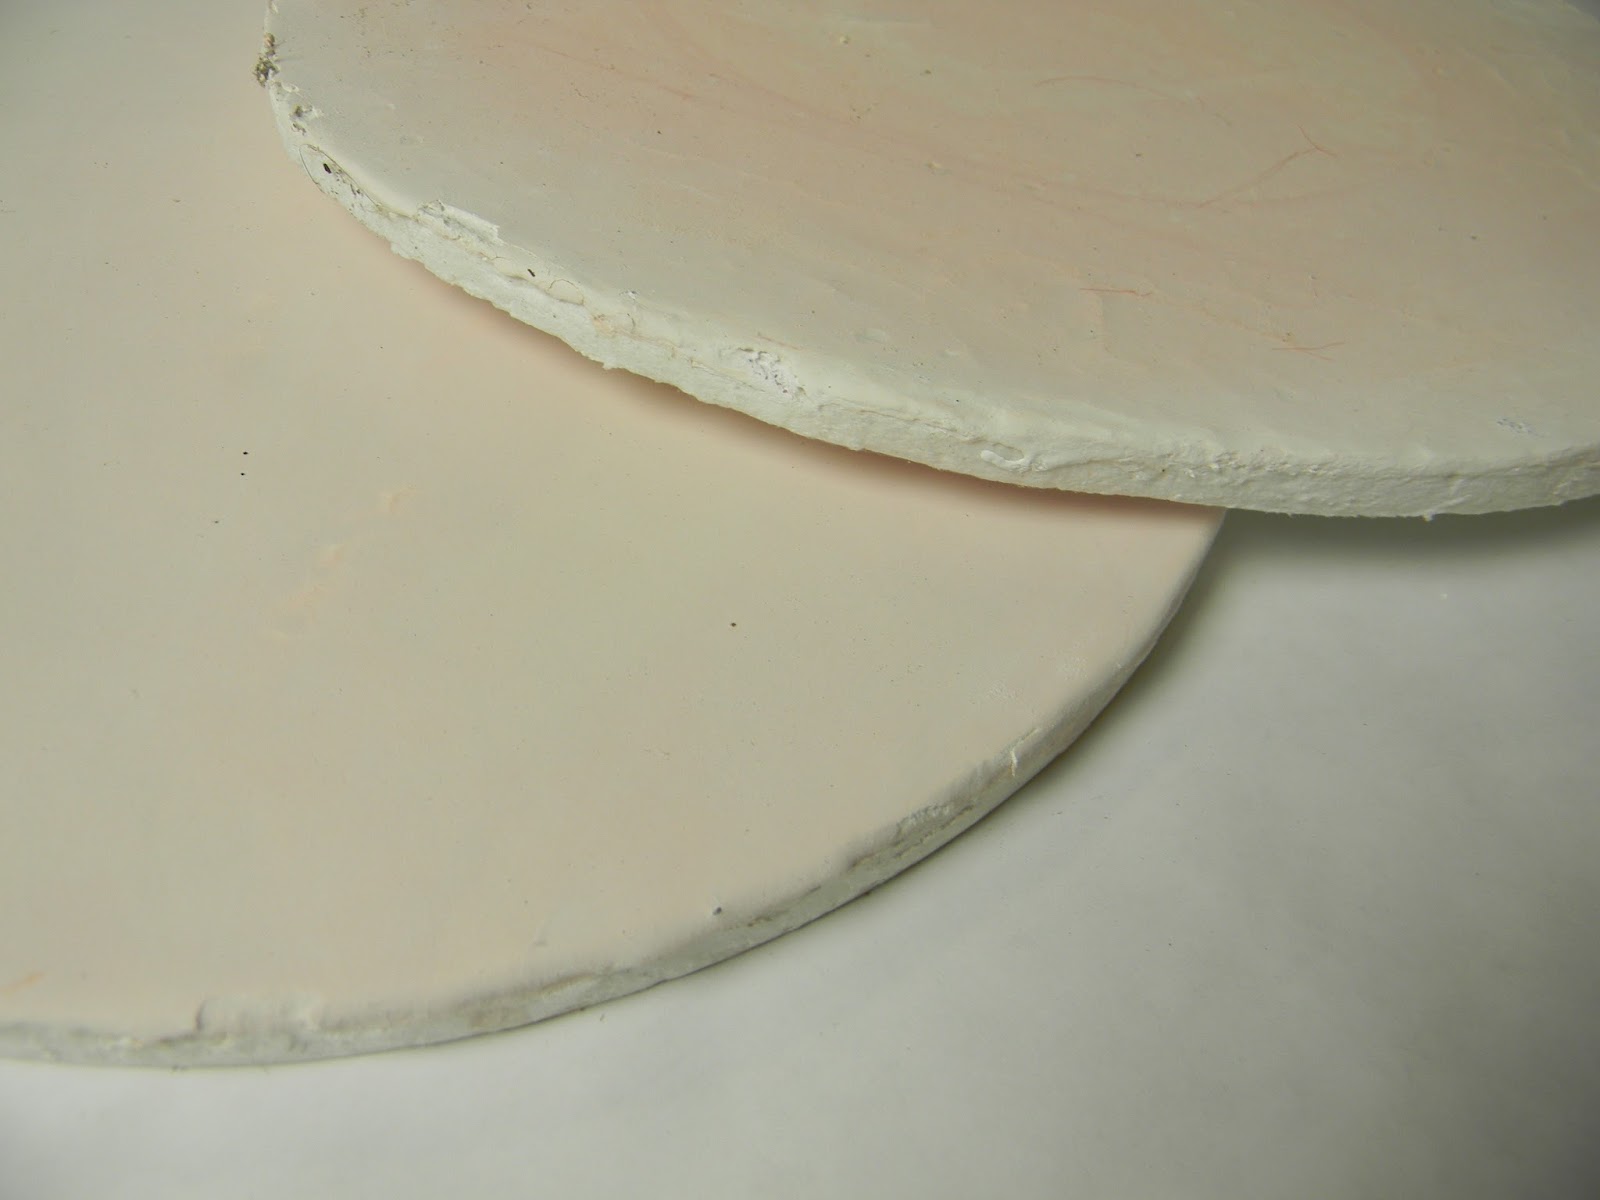
An annealing fracture has a very specific look. It has a
tight curve that rolls into broad gradual curve. (It almost looks like a smile,
but not one that any of us would look forward to seeing.) The broad curve is followed
by another tight curve. In my experience, the break usually runs vertically
through the project. The glass pieces have been fused together and the break is
clean through all three layers. The two broken pieces are generally separated by
a sizable gap. The gap is evidence of the internal stress in the fused glass.
An annealing break can occur inside the kiln or weeks later. This type of break
is the result of rushing the annealing time, peeking into a hot kiln or from
opening the kiln too early and chilling the glass.

You can re-fire the broken glass and re-anneal it but the
finished project may have a visible scar where the glass was broken. You can
add frit or extra accent pieces to hide the seam.
The annealing temperature for any specific family of
fusible material is constant. The length of time a specific project needs to be
held at that temperature is determined by the size of the project and the
number of glass layers used to make the project. A large project, like a 12” bowl, will require
a longer anneal time then small project like a 1” pendant.
The
fix:
consult the glass manufacture’s firing guides and be sure to include the
appropriate annealing temp and time in your firing schedule. Here’s the hard part.
Don’t peek! Or open the kiln below 1000° until it is at room temperature. I
anneal projects that are 12” is size or smaller, made with two layers of glass
plus an accent, like the example here at 960° for 40 minutes.
Incompatibility
Breaks
Compatibility breaks are really upsetting because they’re
so easily avoided. We do our best to sort and organize our glass by COE, but
sometimes a mix-up results in a mystery break. Knowing what to look for can
save you from having any future accidents.
C.O.E. (Coefficient of Expansion) this refers to the rate
at which glass expands and contracts when heated and cooled. Fusing compatible
glass has been formulated, manufactured and tested for compatibility. All the
glass in a single project must be of the same C.O.E. so they expand and
contract at the same rate during firing. If they are not, stress cracks or
breakage will result.

A glass incompatibility break usually has more than one
crack and it often happens a short time after the fused glass comes out of the
kiln. The materials literally repel each other and so the broken pieces are
angular and sharp.
The
fix:
Pay close attention to the manufactures labels, store materials by C.O.E.,
clearly mark scrap and work with only one family of fusing compatible products
at a time. Don’t trust that materials given to you are compatible unless
they’re marked as such.
Refusing the glass is not an option. But if you want to
feel better, take a hammer to the project. Then use the pieces to make a mosaic
or to line the bottom of a fish tank.
The
Dreaded Hole
The dreaded hole in the project is caused by heating the
glass to fast while firing on a very smooth surface like a primed ceramic self
or Thin Fire fiber paper. As the
glass is heated the perimeter of the project becomes soft first. It seals to
the shelf like a suction cup. The air
trapped under the glass expands as it’s heated and pushes up on the glass
forming a bubble. The glass bubble becomes thin, it pops and heals over at the
full fuse temperature.
You can fill the hole and refuse the glass, however a
blemish will be visible in the new piece. If your design is organic the new
detail may add interest. But if your pattern is pictorial, and unless the hole
is perfectly located to represent the sun, not so much.

The
fix:
add a segment to your firing schedule. In the heating phase of my firing
schedule I have a hold at 1300 ° for 60 minutes. Holding at this temperature
softens the glass in the entire project uniformly. This extra step is well
worth the wait as it eliminates inconvenient eruptions and those nasty holes.
Heart-breaks
Fortunately, the fusing spirits grant me many successes and
very few mishaps. But every so often, no matter how hard I work, through no
fault of my own, a single project or piece seems destined to failure. My
general rule it to try to rework or salvage a failed project once and on
special rare occasions twice. If at that point I’m not happy with my results I
abandon the piece and start over from scratch. Hard earned experience has
taught me, addition efforts are a waste of time and resources. My best advice
when that happens is, let it go.
Here’s a quick example. I was building a huge 12 foot by 16
foot wall sculpture with 14 fused glass circles ranging in size from 12 inch to
48 inch across. All of the glass was special ordered from Uroboros. It came in
a single crate. Five of the circles were made with the same color glass. All of the
pieces were fired in the same kiln using the same firing program.
For some unknown reason, one of the five circles broke into
two pieces after fusing. It cracked as neatly as an egg. No problem, I re-fired
the two broken pieces onto a new, single piece of clear. I opened my big
clamshell kiln, when it was at room temperature, the re-fired glass looked
great. Happy with the result, I went back to my worktable a few feet away.
It never happened before and hasn’t happened since. I was
alone in the studio, just me and my glass.
Out of nowhere, the lid on the clamshell came crashing
down. I rushed over to the kiln and opened the lid. No big surprise, the fused
glass circle was broken and in two neat pieces again. Dam isn’t the only word I
used. My rapid fire expletives would’ve made a sailor blush.
I got even by dumping the incontrollable pieces in the
trash. Nope, I didn’t even trust them in a smaller project. Bye, bye! I made a
totally new circle and it’s still intact ten years later.
With luck, this is the first time you’ve been introduced to
these various ways that glass can misbehave. Hopefully, you’re now armed with
the knowledge to avoid such disappointment.
You can confidently explore more
in-depth techniques and more advanced projects.

But for added safekeeping, before closing the lid on my
kiln I blow kisses to my darlings. You might try it.
Happy Fusing!
Lisa
Vegas BABY!
Glass Craft and Bead Expo
March 29 – April 2, 2017
Las Vegas, Nevada
Join
me in Vegas! It’s no gamble. You’ll have a great time!
There’s
still room in these two classes!
Class: TAKE IT TO THE NEXT LEVEL – ADVANCED
FUSING TECHNIQUES
Class#: SA-22
Class#: SA-22
Class: FUSING ART DESIGN!
Class#: SU-01
Class#: SU-01
Announcing
New Upcoming Workshops and Webinars
Advanced Glass Fusing Workshop
May 2-5, 2017
4-Days, Hands-on,
Wesley
Chapel, Florida
Push
the boundaries art glass imposes. Explore innovative approaches to design and
combine multiple advanced techniques to construct original art that reflects
your own personal style. Enjoy: the one-on-one instruction, making large scale
projects, the well-equipped classroom, and the intimate class size.
Inspiration!
Knowledge! Confidence! Get the tools you need to create exceptional glass art
here. You’ll love the concentrated, in-depth study and creative momentum you’ll
gain while actively producing, nonstop for four consecutive days.
Creative Slumping Webinar
May 9, 2017
Meet me in West Palm Beach!
Glass Quest 2017
May 26, 27 & 28, 2017
West Palm Beach,
Florida
A
weekend of education, inspiration and engagement for glass enthusiasts of all
types. Incredible networking opportunities, as well as overall engagement in
the evolving world of art glass education & advocacy! Meet & partner
with other glass artists as we push the boundaries of Glass as a Contemporary
Art Form!
Breaking Through-Making Exhibition Quality Art
Hollander Glass Inc. – Texas
June 9, 10 & 11, 2017
3-day, Hands-on Workshop
Register here http://www.hollanderfusingcenter.com/chptr-houston.php
Join veteran glass artist Lisa Vogt in this comprehensive
workshop focused on making exhibition
quality artwork and you’ll learn how
to take your thriving glass talent and catapult it forward. Through lecture,
demonstration and hands-on exercises, Lisa will show you how to accelerate your
creative vision. Students will learn how to design thoughtful compositions, how
to mix colors to create drama, how to get noticed with pattern, how to
stimulate with texture, and how to combine abstract techniques for innovative
works of fused glass art.
Upscale Fusing Webinar
July 25, 2017
Advanced Glass Fusing Workshop
September 26-29, 2017
4-Days, Hands-on,
Wesley Chapel, Florida
You’ll
love the concentrated, in-depth study and creative momentum you’ll gain while
actively producing, nonstop for four consecutive days.
Push
the boundaries art glass imposes. Explore innovative approaches to design and
combine multiple advanced techniques to construct original art that reflects
your own personal style. Enjoy: the one-on-one instruction, making large scale
projects, the well-equipped classroom, and the intimate class size.