
One of the fastest and easiest ways to improve your fused glass art and dramatically expand your design style is to develop your glass cutting skills.
The beauty of working with fusing is the simplicity of the medium. Many people come to the craft with little or no glass cutting experience. But due to the ease of fabrication and wealth of readily available information, they’re successfully producing attractive pieces from the start.
But if you’re now tiring of the simple cut and assemble methods that got you started and longing to move in a more advanced direction, a small dose of technique is the jump start you need.
It may seem like a trivial topic to address, but your project complexity is in direct relation to your cutting confidence. In other words, the better you cut, the more likely you are to venture outside of your comfort zone and take on more challenging projects.
Here are some tips to get you started.
1 Consistent pressure. Contrary to popular belief, it doesn’t take a heavy hand to make a good score line on glass. What it takes is consistent, medium pressure from the very beginning to the very end of the score. The glass cutter should “sing” as it rolls over the surface of the glass. It’s a pleasant, consistent sound beginning to end. It’s not a cringing grinding noise. A good score is visible its entire length. But it’s not messy and littered with thin splinters. The grinding noise and splinters are signs you’re applying way too much pressure.
Many beginners start strong but let up the pressure as their hand moves farther away from their body. In this case, breakage tends to occur ¾ of the way down the score line. Beginners believe the score comes solely from the hand. A good score comes from making your wrist, elbow and shoulder one rigid tool. This combined strength and rigidity helps you apply consistent pressure the entire length of the score even at an awkward distance from your body.

When cutting an unusually long piece, I turn the glass so I can run my score right to left instead of away from my body. This way I can move my body along with my hand and more easily maintain the consistent pressure needed for a successful break.
2 Cut on the smoothest side of the glass. In some cases, I prefer the look, color or pattern on the textured side of a sheet of glass. I turn the glass over and cut on the smoother side and then simply turn the glass back over when I assemble my project. The glass cutter wheel will have better, more consistent, contact with the glass the entire length of the score if you cut on the smoothest side.
3 Beginning and end. Try to start your score as close to the leading edge of the glass as possible without falling backward off the glass. Apply consistent, medium pressure from the very start. End the score as close to the far edge as possible without falling off the glass. Repeatedly falling off the glass edge will damage the cutter wheel and could possibly cause the glass to shatter.

4 Use the right tool for the job. Use a strip cutter or circle cutter when applicable. Accuracy is key for professional quality artwork. These tools give your work consistency. Plus, they save material by reducing waste and breakage.

When cutting strips, I cut a few more than I need and select the best, straightest strips for my project. The extra pieces find their way into smaller projects, pot melts or free flows. Nothing goes to waste.
Whenever possible, I opt to use running pliers over grozing or breaking pliers to break glass away from a sheet. Running pliers give the most reliable results. They work best if the glass being removed is at least as wide as the rubber tipped plier jaw. When breaking narrow or small curved pieces away, I choose grozing plies because the narrow jaw fits in tight places and allows me to get close to the score line.

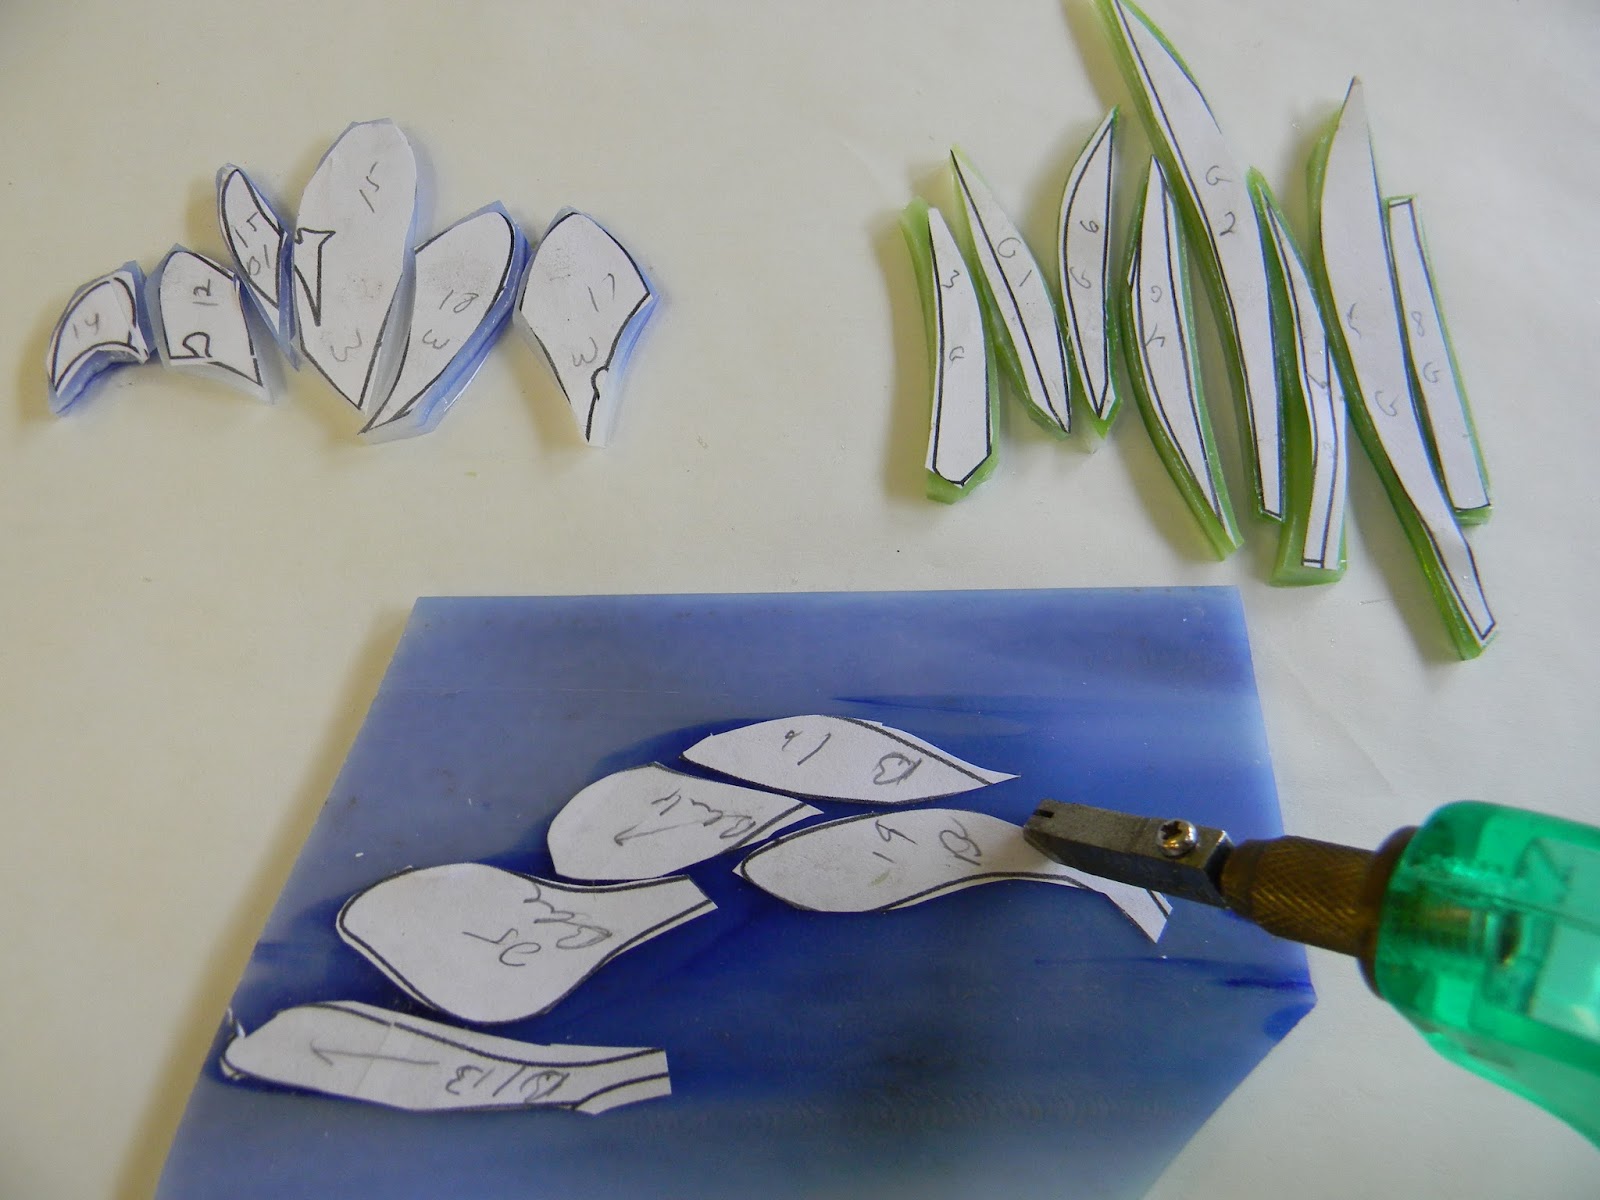
5 Don’t hesitate to cut around a paper pattern to include an intricate shape in your work. This is a terrific way to transition away from strictly geometric designs and into pieces with lively organic elements.
Glass wants to break in a straight line. To cut rounded shapes, we make a series or gradual curves and break the excess glass away in steps until we have a glass shape that closely resembles our pattern.
When cutting around a paper pattern piece, cut as close to the paper as possible without running into it. Beginners tend to cut a wide safety halo around the paper. It just postpones the inevitable. Be brave. Go for it. If the glass is going to break unfavorably the halo, no matter how heavenly, won’t prevent it.
Something to build on.

The more time and effort you put into each step makes the next step easier and the finished product that much better. Don’t rush a project just to get it in the kiln. Give it the time it needs and produce your best work, every time. If you have to ask, “Is this good enough,” it probably isn’t. Do yourself a favor, re-do that piece or step. You can thank me later when you’re doing the, my piece came out awesome, happy dance.

Go ahead. Cut it up!
Happy
fusing!
Lisa
Lisa
Follow my
blog for more tips and tricks!
Artist
Website www.LisaVogt.net
YouTube http://www.youtube.com/watch?v=dhOifd7wukk
Facebook www.Facebook.com/LisaJVogt
YouTube http://www.youtube.com/watch?v=dhOifd7wukk
Facebook www.Facebook.com/LisaJVogt
Author
Website https://lisajvogtcom.wordpress.com/
Twitter
https://twitter.com/lisajvogt

Join me at Glass Craft and Bead Expo
Las Vegas, NV, April 3-7, 2019
Register today class size is limited.
There's still room is theses two classes!


NEW SU-01 - Gallery Quality Fused Glass Made Easy

Upcoming Webinar
Fusing
for the Adventurous Webinar
It’s LIVE! I come to YOU!
April 11, 2019
Get ready to push boundaries, challenge trusted techniques and
enjoy the thrill of limitless possibilities. Join me in this comprehensive
hands-on webinar and learn how easily you can put tried and true methods to use
in unlikely, innovative ways to create original art.
You’ll learn how to successfully employ different techniques to produce dramatic effects and take your work to an exciting, new level of sophistication.
You’ll learn how to successfully employ different techniques to produce dramatic effects and take your work to an exciting, new level of sophistication.
Beginner and advanced fusers alike will find inspiration,
motivation and renewed artistic freedom from the combination of techniques
shown. In addition, you’ll receive a detailed outline with project specific
guidelines and Lisa’s custom firing guides.
Armed with your newfound skills, you’ll be eager to experiment and incorporate these techniques to turn your creative visions into reality. You’ll have the burning desire, and the cool confidence, to take your passion to greater heights.
Armed with your newfound skills, you’ll be eager to experiment and incorporate these techniques to turn your creative visions into reality. You’ll have the burning desire, and the cool confidence, to take your passion to greater heights.

Learn at home at your own pace. Instructional
Videos are here!
Available here: http://www.lisavogt.net/shop.aspx?id=40

Check out my writer’s website.
No comments:
Post a Comment