 |
| Black Tie Affair as seen in Sculptural Fused Glass Video |
I love seeing all the new, creative projects being shared online
in our glass groups. You are making amazing, beautiful pieces. It’s apparent from
the well thought out compositions and quality construction that our community
has grown in skill and talent.
Such wonderful art can be even more impressive with a great
picture.
Myth buster: you don’t need expensive photo equipment and
fancy lights to get a clean, clear, impressive picture of your art.
Yes, there’s a time, and purpose for high quality professional
gallery grade images like those taken in a photo cube. But not every piece of art
needs that level of sophistication to show well. You can take really nice pictures with simple techniques and a little planning.

The most important element of your fine art picture is the background.
It should be plain and enhance the art without distracting the eye.
Here’s how to make your own effective photo set-up.
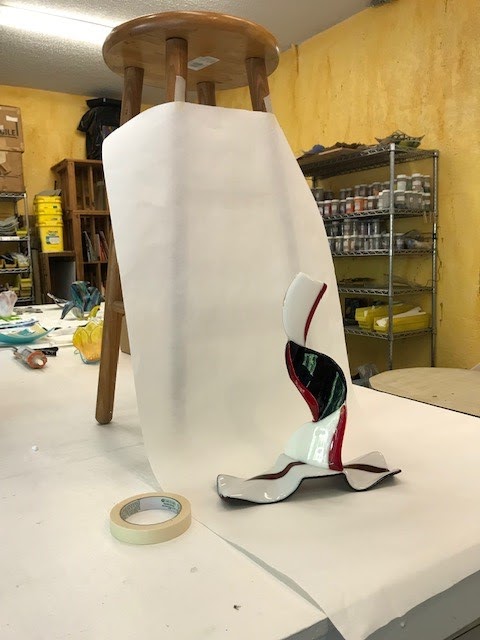
Prior to making art for galleries, all of the pictures of
my finished fused glass art were taken with very simple set up. I’d place a wooden
bar-height, bar stool on my work table. I’d place the bar stool in an area filled
with strong natural light Then I’d tape a long, 24 inch wide piece of white
paper high up on the bar stool legs. The paper would hang down from the legs
and drape across the table. The paper made a bright, seamless backdrop that showed
off my glass art without unwanted distractions. I still use this fast, easy
technique for quick pictures today.
Another super, simple set-up is to photograph your art on a
sheet of white foam board or white poster board. The board has a reflective sheen
that enhances the bright glass colors.
The smooth surface brings the glass to
life. I keep a clean board tucked away behind a door where it won’t get bent or
dirty. Then when I need a quick picture, I pull it out and shoot away. It’s
also a convenient backdrop if I want to take a picture outside. I carry the board
and art into the yard and can pick a variety of filtered light sources for my
photo shoot. Note: I avoid using white cotton fabric as a background. The fine woven
texture absorbs the glass shine and makes the project look dull and lifeless.
 |
| Photo taken outside on white foam board. |
Glass can be particularly difficult to photograph due to the
bright colors, transparency and reflective qualities. But both of these set-ups
have worked well for me. The clean white backgrounds ensure that the real colors
and intricate details of my art shine bright and true.
 | ||
| Notice the yellow tint on this image taken under florescent lights. |
 |
| Photo taken with true white photo flood lights. |
Quick
Tips for Great Images
Photograph the art on white paper, foam board or poster board.
Use natural light to illuminate the glasses true colors.
Avoid using florescent lights, they leave a yellow tint on
the art glass.
Take multiple pictures from several different angles.
Avoid clutter in the background.
If you include a background, use something that enhances
the art. It shouldn’t distract of confuse the viewer.
Crop the image with the camera. Get in tight. Fill the view
finder with the art.
Center the art in the picture.
Take the picture at eye level for a true representation of
the art.
Make sure the image of the art is level with the bottom of
the photo and not at a distracting angle.
Once you have the shot. Try different creative compositions
to see if something unexpected delivers a unique perspective.
You can take really
nice pictures with simple techniques and a little planning. You worked hard on
your newest project. Don’t stop there. It deserves a great picture to show it
off!
Happy fusing!
Lisa
Follow my
blog for more tips and tricks!
Artist
Website www.LisaVogt.net
YouTube http://www.youtube.com/watch?v=dhOifd7wukk
Facebook www.Facebook.com/LisaJVogt
YouTube http://www.youtube.com/watch?v=dhOifd7wukk
Facebook www.Facebook.com/LisaJVogt
Author
Website https://lisajvogtcom.wordpress.com/
Twitter
https://twitter.com/lisajvogt
Upcoming
Webinar
Let’s get together and fuse glass!
 |
| Photo taken outside on white foam board. |
Make a Fused Glass Sink Webinar
Tuesday, May 14, 2019
Register here:
Creating a stunning dichroic glass sink is easy
when you know how!
In this comprehensive Webinar, I'll guide you step by step through the time-tested processes she uses to make large-scale, functional vessels.
You'll learn safe handling techniques for cutting oversized circles, how to fuse and slump thick pieces to retain consistent bowl height, plus trade-secrets for worry free drilling.
In addition to fabrication know-how, you'll receive a complete supply list, specifics on kiln requirements, source information for the slumping mold and drill kit, as well as helpful installation tips.
With all the professional tricks revealed, you'll gain the confidence and knowledge needed to make your own dazzling beauty.

Learn
at home at your own pace. Instructional Videos are here!
Available here: http://www.lisavogt.net/shop.aspx?id=40

Check out my new writer’s blog.
Writer – Instructor – Artist
No comments:
Post a Comment